Crafty Secrets December Linky Party – Peace Christmas Banner and Tutorial

Peace Christmas Banner by Paper Melody's for Crafty Secrets December Linky Party

Crafty Secrets December Linky Party – Peace Christmas Banner and Tutorial

HAPPY DECEMBER EVERYBODY!!!  My birthday is this month, Christmas is this month, New Years Eve is this month…so much fun in store!  And to kick it all off is the monthly Linky Party at Crafty Secrets!  This month’s theme options are Christmas, Cooking, and Calendars, and I decided to go with the first – Christmas!  Using the letters and blue damask papers from the Creating with Vintage Christmas CD #6 and stamps from the Vintage Christmas digital set, I created a banner for home decor.  Have a look, but first a little warning; This is a longer post, but be sure to stick around for the Tutorial at the end!  :

Peace Christmas Banner by Paper Melody's for Crafty Secrets December Linky Party

And a slightly closer look:

Peace Christmas Banner by Paper Melody's for Crafty Secrets December Linky Party

I started with a lovely pearlescent heavy cardstock, which I cut into pennants and embossed with a swirly patterned folder.  Then, I printed the blue damask and made smaller pennants.  I layered those over white gauze on the heavy cardstock, and attached everything with some silver eyelets.  I printed and fussy cut the letters while my Silhouette was busy cutting out the snowflakes in the background (see the tutorial!), then I added glitter and rhinestones to everything and layered it all together.

For the pennants on each end, I first sized the blue damask paper in Microsoft Word, then arranged various stamps from the Vintage Christmas Digital Stamp set in shades of blue.  After printing, I added more glitter and rhinestones.

Peace Christmas Banner by Paper Melody's for Crafty Secrets December Linky Party

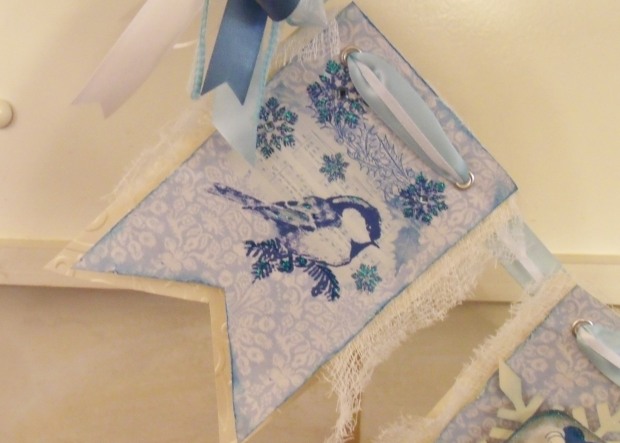
Finally, I threaded light blue and white ribbons through the eyelets, and added a bow on each end.  And there you have it!

Now it’s your turn!  Visit each of the design team blogs listed below.  Then create a NEW project of your choice featuring Crafty Secrets product and link it up to the blog no later than 11:59PT, Sunday, December 14th. You do not need to follow this month’s theme to play along.  If you do not have any Crafty Secrets goodies, check the FREE DOWNLOADS located in the sidebar of the Crafty Secrets blog.  Be sure to link to the Crafty Secrets Blog in your post, and let us know what Crafty Secrets product you are using in your project. One lucky player will be randomly selected to win a $40 shopping spree in our online store.  Each player who participates will receive a free digital download.  We’ll be popping by to leave you some lovely comments on your blog post, too. Thanks for playing along, and good luck!

Kathy Clement, DT Leader * Darlene Pavlick, Dar’s Crafty Creations * Diane Hover, Nellie’s Nest * Elizabeth Lincoln, Paper Passtimes  * Gloria Stengel, Scraps of Life * Melody Clement, Paper Melody’s (you are here!) * Michele Kovack, Thoughts of a Cardmaking Scrapbooker *Shantaie Fowler, Inking Pink * Sheila Rumney, Sheila Rumney Design and Photography * Guest Designer Birgit Norton, Crafting While I Wait * Guest Designer Glenda Brooks, MagPie’s Corner *

Tutorial: Cutting Digital Stamps with your Silhouette Machine

I’ve had several requests for a tutorial on using a Silhouette machine to cut out the Crafty Secrets digital stamps and images, so I thought now would be a good time to share!  I have a Silhouette Portrait and use Silhouette Studio Version 3.0.  Older versions may not have the the automatic trace function, but I’ve detailed 2 ways for cutting out images, so you should be covered!

Automatic Trace

Use your Silhouette machine to cut out digital stamps and images
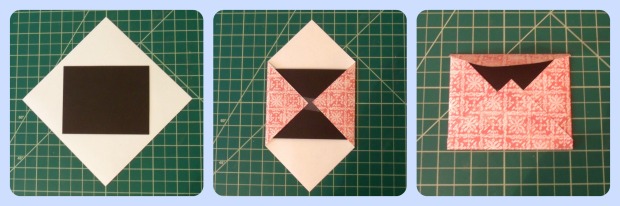
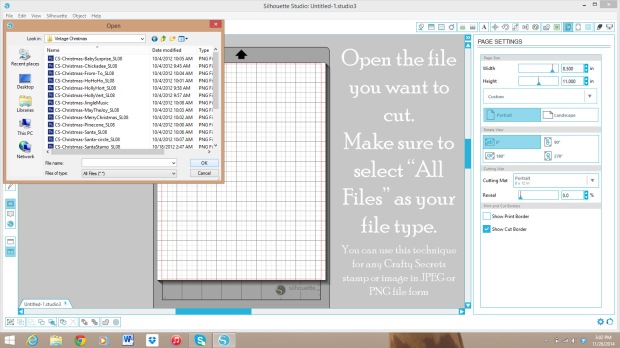
First, open the file you want to cut.  Make sure your file type is “All Files.”

Use your Silhouette machine to cut out digital stamps and images
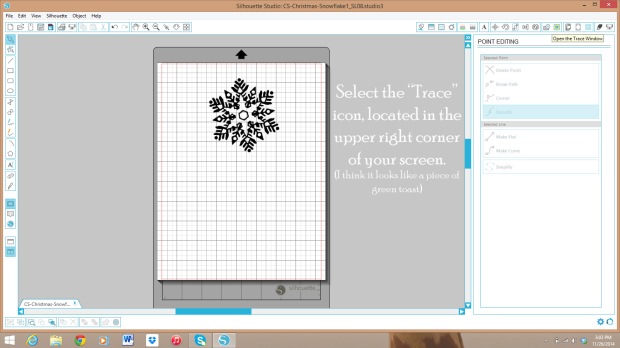
Your image will appear in the upper left corner; re-size and position it to your preference.  In the upper right corner of your screen, select the “trace” icon.

Use your Silhouette machine to cut out digital stamps and images
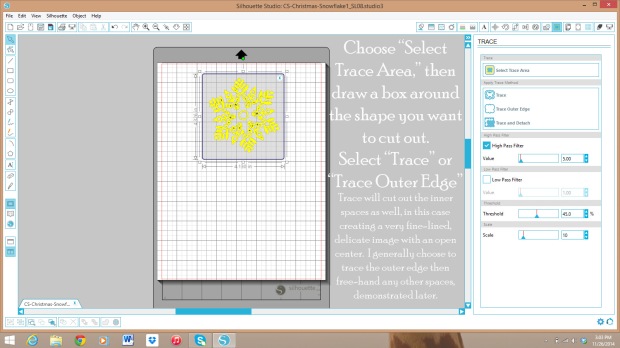
Choose “Select Trace Area,” draw a box around your shape, and choose the trace option you prefer.

Use your Silhouette machine to cut out digital stamps and images
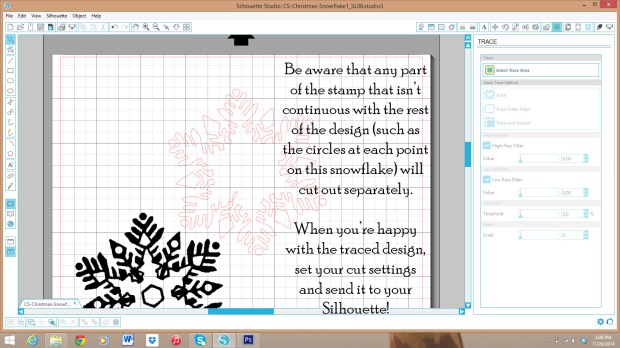
I’ve moved my shape so you can see the red cut lines that appeared when I selected “Trace Outer Edge.”

Manual Tracing

Use your Silhouette machine to cut out digital stamps and images

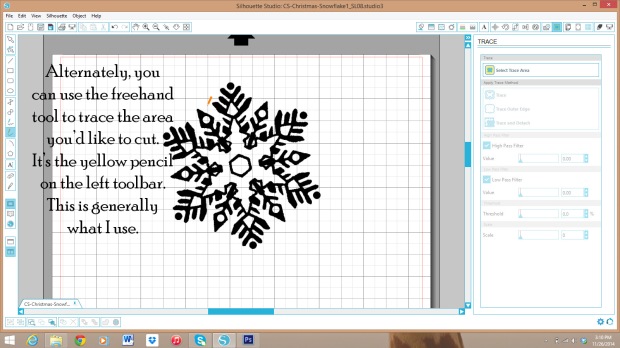
For older versions of Silhouette Studio, or for custom tracing options, use the freehand tool to trace your shape.

Use your Silhouette machine to cut out digital stamps and images

Use your Silhouette machine to cut out digital stamps and images

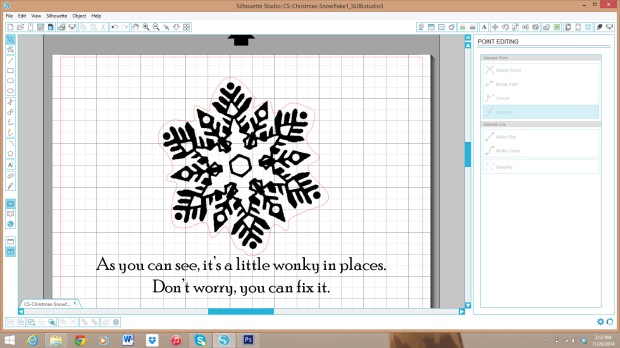
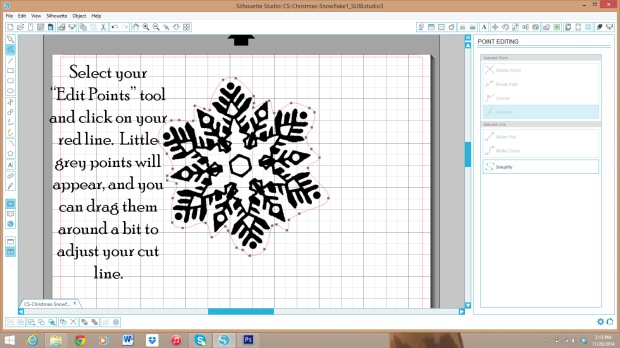
Use the “Edit Points” tool to fix the wonky bits 😉

Use your Silhouette machine to cut out digital stamps and images

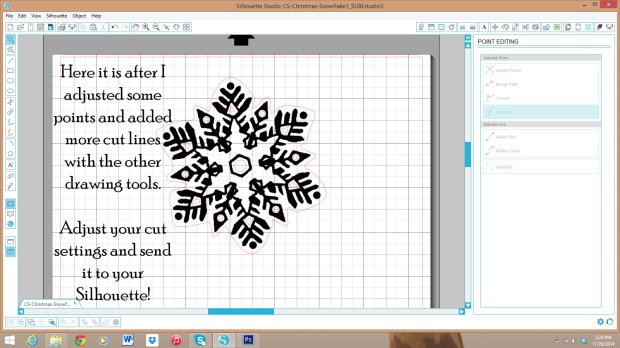
There are also rectangle, circle, and polygon drawing tools.  When you’ve adjusted the cut line to your heart’s desire, adjust the cut settings and send the design to your Silhouette!

There you go, a basic tutorial on using your Silhouette to cut digital images!  It can be a little time consuming and definitely takes practice, but it’s a really helpful way to minimize fussy cutting.  I find it incredibly useful!

And there you have it!  I can’t wait to see what you come up with for this month’s Linky Party at Crafty Secrets!


November Linky Party Advent Calendar and Envelope Tutorial

advent 3

Crafty Secrets November Linky Party – Advent Calendar and Envelope Tutorial

Hello, everyone, and happy November!  I can’t believe how fast October went by, can you?  Before we know it we’ll be eating turkey and decorating Christmas trees…exciting, but where has the time gone?  Anyway, since it’s the first Monday of a new month, it’s time for the Crafty Secrets Linky Party!  This month’s theme is Christmas/Winter, and the Design Team has come up with some great inspiration for you!  My project is an Advent Calendar made with digital papers and images from the Creating with Vintage Christmas CD.  Take a look:

advent 1

This Advent Calendar is made up of 24 envelopes, each one hung with a tiny clothespin onto a large wooden frame.  Inside of each envelope is a handmade ornament or other little goodie made with various papers and images from the Vintage Christmas CD and Christmas Images and Journal Notes booklet.  What a treat!

Advent 2

I started by choosing 8 digital papers from the CD, sizing and printing them through Microsoft Word.  Then, I used the Advent Numbers included on the CD, resized them in Word, printed them, and used my Silhouette machine to cut them all out (No, I didn’t fussy cut them all…aren’t you proud of me!?).  Each number got a little age with the help of my Distress Inks, and then some glitter glue for sparkle!  While they were drying, I die cut 24 shapes from cream cardstock and 24 shapes from a variety of green, silver, and gold cardstock.  Layering, gluing, stamping in gold, and foam squares happened, and then all I had to do was stuff the envelopes and hang them up using little clothespins!  Who doesn’t love little clothespins?  For a tutorial on how I made the envelopes, keep reading!

Now it’s your turn!  Visit each of the design team blogs listed below.  Then create a NEW project of your choice featuring Crafty Secrets product and link it up to the blog no later than 11:59PT, Sunday, November 16th. You do not need to follow this month’s theme to play along.  If you do not have any Crafty Secrets goodies, check the FREE DOWNLOADS located in the sidebar of the Crafty Secrets blog.  Be sure to link to the Crafty Secrets Blog in your post, and let us know what Crafty Secrets product you are using in your project. One lucky player will be randomly selected to win a $40 shopping spree in our online store.  Each player who participates will receive a free digital download.  We’ll be popping by to leave you some lovely comments on your blog post, too. Thanks for playing along, and good luck!

Kathy Clement, DT Leader * Darlene Pavlick, Dar’s Crafty Creations * Diane Hover, Nellie’s Nest * Elizabeth Lincoln, Paper Passtimes  * Gloria Stengel, Scraps of Life * Melody Clement, Paper Melody’s (you are here!) * Michele Kovack, Thoughts of a Cardmaking Scrapbooker *Shantaie Fowler, Inking Pink * Sheila Rumney, Sheila Rumney Design and Photography * Guest Designer Birgit Norton, Crafting While I Wait *

Mini Envelope Tutorial

For this project, I knew I wanted little envelopes, the kind that are too small to mail.  I searched for an easy template, but most of what I found told me to unfold an existing envelope to use as a template.  That wasn’t going to work, so I set about making my own design and, once I had it figured out, working out a formula for future envelopes.  I hope you find everything useful!

1. Begin by deciding what size envelope you want and making a template out of cardboard or sturdy cardstock.  My template measured 3 x 3.75″  Now, the formula.  * Warning!  Nerd Alert!  I love math.  If it makes you feel sick, skip to the nice little list at the end of this step * Multiply the longest side (3.75″ in my case) by 2, and that’s how long you want the diagonal of your square to be.  So, I needed the diagonal of my paper square to be 7.5″  Then, jump in a time machine and go back to your high school Geometry class and use your Pythagorean Theorem to figure out how long the sides of your square need to be.  a² + b² = c² , c = your diagonal, and a & b = side lengths.  That’s as far as I’ll go, but if you want me to do the math I am more than happy to do so, because I’m a nerd.  In the meantime, here’s a little chart for easy access (numbers have been rounded for easier measuring):

3 x 3.75″ envelope : 5.25″ square

A1 envelope : 7.25″ square

A2 envelope : 8 1/8″ square

A6 envelope : 9.25″ square

2.  Print your paper from the CD and cut your square to size.  If you want a lined envelope, print your paper double sided.  Then, on the back, place your template in the middle and fold in the sides, then the bottom and top:

Envelope Collage

3.  Unfold your paper, remove the template, and cut out the little triangles formed at the corners of the envelope.  This will reduce bulk

envelope 3

4.  Optional.  I used a tool to round the corners of the top and bottom flaps, purely for looks

envelope 4

5.  Fold in the side flaps, and apply glue along the edges of the bottom flap as shown by the pencil lines in the picture below

envelope 5

6.  Fold up the bottom flap, let it dry, and you’re done!  If you want your envelope to seal, you can apply double stick tape, tape runner, or Lick-and-Stick envelope glue to the top flap, but I figured they’d stay prettier (and useful for more than one year!) if I left them open.

envelope 6

And there you have it!  Decorate the outside, fill it with something fun, and you’re set.  A little note: careful with patterns.  A pattern that starts diagonally will end up going straight across your envelope with this design, and a straight design will end up diagonal.  Not a big deal, but if you’re in love with a pattern the way it is then it’s something to remember.

Thanks for stopping by!  I hope you found inspiration to enter your own Crafty Secrets Linky project by midnight PST, Sunday November 16th.  Have a lovely day!